Your Cart is Empty


How To Make A Hamon On A Knife

Quick Summary
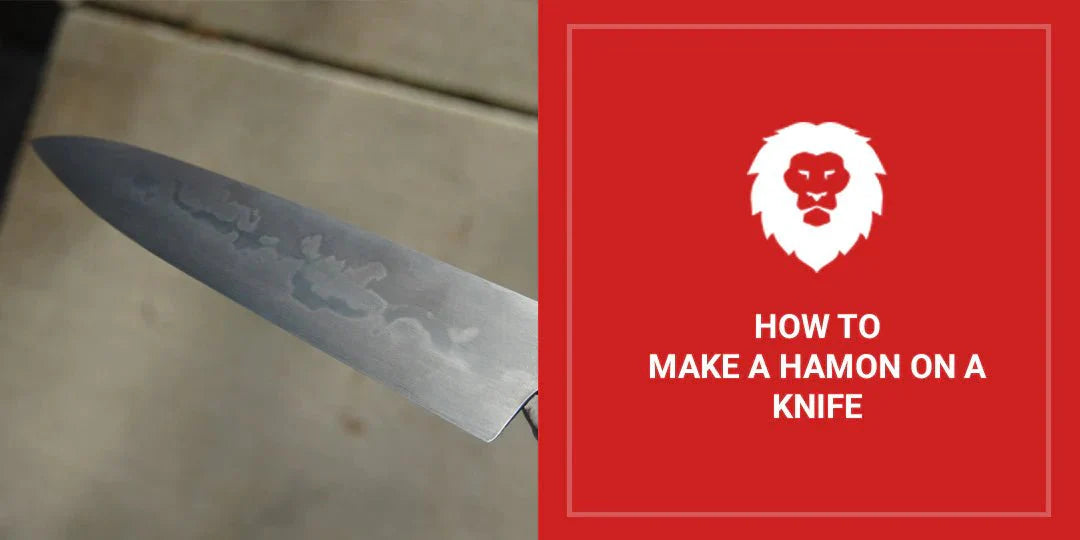
A hamon is a visible line on a knife blade caused by differential hardening. You can create a hamon by using insulating clay on the blade, which will affect the way the steel transforms with heat. The parts of the blade with and without clay will harden differently, creating the hamon.
Chances are that you’ve seen and admired a hamon. It’s a visual demarcation that appears as a wavy line across the surface of a knife or sword blade. During etching, the acid eats away more at the softer section, which appears darker, and the harder edge section appears lighter, creating a clear visual distinction.
In popular culture, the hamon is most commonly found on the traditional Japanese katana blade. Around 700 AD, the swordsmith Amakuni Yasutsuna is said to have developed both the hamon and the katana, establishing a bladesmith tradition that’s still followed today.
The hamon is caused by differential hardening. The cutting edge is hardened steel while the spine is soft and pliable, making it less likely to break. Hardness difference is the process objective; the singular appearance is merely a side effect. However, the aesthetic qualities of the hamon are quite desirable, not only as evidence of the differential-hardening process, but also because the patterns can be quite complex.
Steels for Producing Hamons
Most manufacturers who create hamons choose carbon steels since they are shallow hardening. Options include W1, W2, 5160, 01, L6, and the 10xx series. These steels are considered suitable for the very rapid quenching requirements of clay-coated quenches. You can use stainless steels too, but their composition doesn’t produce a striking hamon: more like a straight line.
Thermal Cycles
A hamon appears at the line between softer and hardened steel. As a prelude to heat treating, you should anneal and or normalize your blade thoroughly once you have completed a rough grinding. In terms of producing a clear hamon, this step sets you up for success.
The Clay Coat
In terms of insulating clay, there are a few products that most knifemakers use aside from traditional Japanese clay. They include:
- Exhaust sealant
- Refractory cement, which is a mortar used to coat furnaces and forges
- Clay used to seal fireplace bricks
Many bladesmiths use their own blend of materials that include oven clay, Holts Gungum, and charcoal powder/ hardwood ashes.
Using your fingers, a brush, or putty knife, coat both sides of the blade in the same place. The shape you apply it in is entirely up to you. You can do the traditional Japanese waves, or you can create images for some really interesting results.
If you apply your clay too thick, residual heat in the spine will spread into the edge and soften it. Having too thin a layer will result in hardened spines and edges, which will not produce a well-defined hamon. (You might want to experiment with the size, thickness, and placement of the clay bits used for producing ashi, or the white smokiness that appears in the polished hamon.) At least one centimeter of steel should be exposed between the cutting edge and the clay, as the hamon will not terminate exactly where the clay does.
Allow the clay to air dry for a few hours, then place it in the oven at 275⁰F for 30 minutes. During the heat treatment, if the clay isn't dry, it will bubble and flake off and affect your pattern, so some bladesmiths heat the blade slightly before applying the clay.
Heat Treatment
Clay insulation applied to achieve the hamon will also insulate the blade during heat treatment. When shooting for a hamon, you may want to increase your normal holding time since the coated/covered steel needs a bit more time to heat uniformly. If you aren't using a furnace or oven, use a magnet to check critical areas, taking care to not burn yourself.
Water vs Oil Quenching
A greater hamon activity (a more diffuse and cloudlike pattern) is achieved through a water quench. However, as this is a much more rapid quench, there are greater chances of cracks and blade failures. It is safer to use oil, as there is a lower risk of catastrophic blade failure, and the pattern has more defined boundaries.
You can submerge your blade edge or tip first. If the blade is moved back and forth, the vapor barrier/jacket will be reduced, rapidly reducing the temperature. Keep it in the quenchant until room temperature is reached.
Remove the residual clay from your hamon and clean off the oil before lightly grinding the edge of the blade to make the pattern more pronounced. At this stage, you can also lightly etch the blade to help you see the hamon.
Tempering
If you have the hamon you like, the next step is to temper your blade. At the moment, it is very brittle; you need to reduce the hardness and adjust it for the intended purpose.
Knives are rated for hardness based on what's called Rockwell hardness (aka HRC) of the steel. It is used to determine the amount of dent/mark that a diamond point can create in metal with a certain amount of weight. Blades around 60-61 HRC, for example, are great for slicers. Because of the impact they must endure, choppers should be softer.
Bringing Out the Hamon
Machine Finish
Once you have tempered your blade to the desired hardness, grind it to the final thickness. A 400-grit abrasive should do the trick, but watch for the results you want. Make sure you do not overheat your blade at this point in the grinding process, as doing so could ruin your temper and even your hamon.
Etching
Now it's time for the acid etch. While many people use a ferric chloride etchant 4:1, others use apple cider vinegar, boiling vinegar, lemon juice, and even coffee! Generally, a weaker acid will reveal more detail, but will also require more cycles.
Ensure the blade is very clean, as oil or grease will block the acid. Then immerse it. Every 10 seconds or so, take out the blade, clean off the oxides with some 0000 steel wool or an ultra-fine sandpaper, and place it back in the acid. Repeat until the hamon is as clear as possible. After you have cleaned the acid off, you need to neutralize and wash the blade. An oil/wax coating is recommended for carbon steels since they rust.
Hamon Polishing
The final polishing is probably one of the most important steps. In fact, Japanese sword makers often send their blades to master polishers in order to reveal the subtle beauty of their hamons. You can get an outstanding result with metal polish like Autosol or Brasso or try a polish made from powdered silicon carbide or aluminum oxide suspended in oil.
FYI: Magnetite is the black oxide that appears during etching. To bring out the subtle features of more complex hamons, the Japanese mix it with clove oil and rub it into the steel in the Sashikomi Nugui polishing process. In repeated cycles, they use this oxide to enhance the subtle features of the hamon.
A Quality Abrasive Yields a Superior Hamon
Making a hamon on a knife involves some complex steps, but once you master them, the results can be both beautiful and unique. Red Label Abrasives offers a wide range of sanding belts, sanding sheets, and other specialty abrasive products that can shape your blade and enhance the beauty of its hamon. To learn more about our abrasives or place an order, please call 844-824-1956 or fill out our contact form.
Take Your Knife Making To The Next Level


Belt Packs Made For Knife Makers

2 X 72 Inch Knife Makers Sanding Belts Assortment

2 X 60 Inch Knife Makers Sanding Belts Assortment

2 X 48 Inch Knife Makers Sanding Belts Assortment

2 X 36 Inch Knife Makers Sanding Belt Assortment

2 X 42 Inch Knife Makers Sanding Belts Assortment

1 X 30 Inch Knife Makers Sanding Belts Assortment

1 x 42 Inch Knife Makers Sanding Belt Assortment
Shop By Product Category


Why Choose Red Label?

