Your Cart is Empty


How to Sharpen Scissors & Shears

Quick Summary
Sharpening scissors and shears restores cutting accuracy, reduces effort, and extends tool life. Each blade must be cleaned, sharpened, and polished in sequence while maintaining its original bevel angle. Coarse abrasives shape the edge, medium grits refine it, and fine grits or polishing compounds create a smooth finish. Aluminum oxide, zirconia, ceramic, and silicon carbide each serve different stages and steel types, allowing you to control how much material you remove. Regular cleaning, lubrication, and inspection keep the edges sharp longer and reduce the need for frequent regrinding. Using high-quality abrasives from Red Label Abrasives ensures consistent performance and professional-grade results on every sharpening job.
If you work in fashion design, hairstyling, and even landscaping or metalworking, you want to keep your scissors or shears in prime working condition. When blades lose their edge, they compress material instead of slicing it, creating ragged cuts and uneven lines. Dull blades also force you to use extra pressure, which increases hand fatigue and can throw off alignment between the cutting edges.
A sharp edge allows both blades to meet at the correct contact point, producing a clean shear through fabric, paper, or metal. In precision work, such as tailoring, upholstery, grooming, or metal trimming, the difference between a clean cut and a drag mark comes down to the sharpness and angle of the bevel.
You don’t need advanced equipment to maintain that quality. With a solid workspace, a basic disc sander or sharpening station, and properly graded abrasives, you can restore the original bevel and cutting efficiency of your scissors or shears. This guide will take you through the steps of disassembling, cleaning, sharpening, and polishing your tools. You’ll also learn how to select the correct abrasives, maintain consistent angles, and care for your blades after sharpening so they keep cutting accurately through repeated use.
Scissors and Shears: Their Anatomy, Types, & Edge Geometry
Before you sharpen any pair of scissors or shears, it helps to know they’re built and how the blades interact.
Each pair has two blades that pivot on a screw or bolt. One blade forms the lower cutting surface, while the other slides across it. The inside of each blade is slightly hollowed, creating a small gap called the “ride line.” That gap reduces friction and ensures the blades meet at a single contact point along the cutting edge. The outer surface of each blade holds the bevel, which is the angled area that forms the cutting edge. Maintaining that original bevel is key to proper sharpening.
Fabric shears and paper scissors typically have a flat bevel of about 30 to 45 degrees. Hair-cutting shears, on the other hand, use a finer, convex edge that allows smoother motion through soft material. Pruning or metal shears may have a wider angle for durability since they cut thicker, tougher materials. These design variations affect how much material you remove during sharpening and which abrasive grits you’ll need to restore the edge.
You’ll also see differences in blade steel and coatings:
- High-carbon steel holds a sharp edge longer but can corrode without maintenance.
- Stainless steel resists rust but wears faster under heavy use.
- Some industrial shears use tungsten or titanium coatings to reduce wear.
When you sharpen any of these materials, the hardness and heat resistance determine how aggressive your abrasive should be. Using the correct grit range and applying steady, moderate pressure prevents overheating and maintains the blade’s temper.
|
Type |
Typical Use |
Bevel Angle Range |
Edge Style |
Blade Material |
Sharpening Notes |
|
Fabric Shears |
Cutting textiles, upholstery, patterns |
30°–45° |
Flat bevel |
High-carbon or stainless steel |
Maintain consistent bevel; polish to reduce friction on soft fabrics. |
|
Paper Scissors |
General office or craft cutting |
35°–40° |
Flat bevel |
Stainless steel |
Moderate pressure with mid-grit abrasives; avoid over-polishing to preserve bite. |
|
Hair-Cutting Shears |
Professional salon or grooming use |
40°–50° (convex) |
Convex or semi-convex |
Hardened stainless steel or cobalt alloy |
Use fine grits (600–2000) for mirror finish; maintain factory convex contour. |
|
Pruning Shears |
Horticulture, gardening, light agriculture |
45°–60° |
Single-bevel (one flat side) |
High-carbon steel |
Start with coarse grit to remove nicks; maintain relief angle for smooth action. |
|
Kitchen Shears |
Food prep and meat trimming |
40°–50° |
Flat bevel |
Stainless steel |
Clean thoroughly before sharpening; finish with fine grit to avoid micro-burrs. |
|
Industrial / Tin Snips |
Sheet metal, wire mesh, HVAC work |
50°–65° |
Reinforced bevel |
High-carbon or alloy steel |
Use coarse and medium abrasives; cool between passes to prevent temper loss. |
|
Craft Scissors |
Paper, vinyl, and mixed media |
30°–45° |
Flat bevel |
Stainless steel or titanium-coated |
Light passes with fine grit maintain sharpness without removing too much material. |
Safety, Tools & Materials You’ll Need
Before you begin sharpening, prepare your workspace and gather the right tools. A clean, stable area reduces vibration and helps you keep consistent blade contact during each pass, while good lighting lets you see burr formation and surface reflections that indicate edge condition. Wear safety glasses to protect against airborne particles and gloves that provide grip without restricting control.
You’ll need a few standard tools and materials to complete the sharpening.
- Sander:A disc sander, belt sander, or sharpening station provides the motion needed to recondition the bevel.
- Abrasives:Have a full range of abrasive grits available, from coarse (40–80) for heavy material removal to fine (600–2000) for polishing.
You’ll also want to collect:
- Screwdrivers or wrenches for disassembly
- Cleaning rags
- Mild detergent or degreaser
- Light machine oil
- A strop or buffing pad, paired with a polishing compound
Clamp or secure the sander and make sure the disc or belt surface is clean and balanced: a solid mount prevents chatter and ensures consistent contact across the bevel. If your work generates metal dust, use a vacuum or dust collector nearby to maintain visibility and prevent buildup.
Step-by-Step Sharpening Process
Sharpening scissors and shears follows a clear, repeatable sequence that produces consistent results when performed correctly. Working in order prevents uneven wear, maintains the original bevel angle, and protects the blade’s temper.
Step 1: Disassemble and Clean the Blades
Start by separating the blades. Use a screwdriver or wrench to remove the pivot screw and lift the blades apart. This exposes the entire cutting surface and prevents the opposite blade from interfering while you work. Keep track of any washers or tension springs so you can reassemble the tool correctly later. Mark the blades if needed to remember which one sits on top.
Next, clean each blade with mild detergent or degreaser to remove residue, adhesive, or oil buildup. Rinse and dry the surfaces thoroughly. If you see rust or oxidation, use a coarse abrasive such as 80-grit aluminum oxide to clear the surface without gouging the metal.
You should also check the edges for nicks, bends, or deformation. If one blade is slightly warped, flatten it by laying it on a hard, smooth surface and pressing gently along the curve until it returns to shape. Finish this step by wiping each blade with a thin coat of light oil to protect it during sharpening.
Step 2: Sharpen the Bevels
Select the correct abrasive for your starting condition:
- For blades with visible wear or small chips, begin with 80- or 120-grit.
- For maintenance sharpening, 220-grit is usually sufficient.
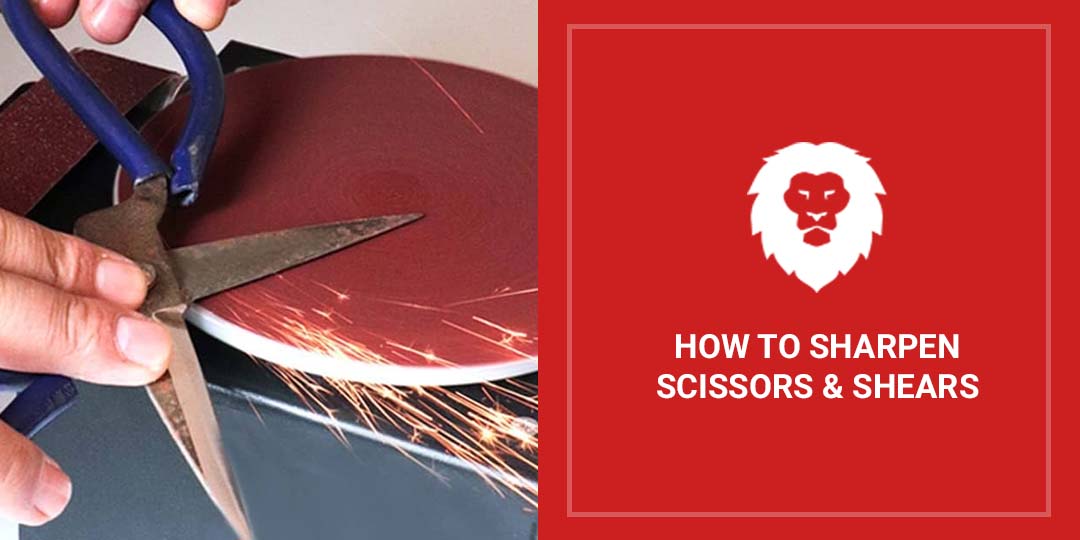
Secure the blade so that the bevel rests flat against the sanding surface. Maintain the original angle, which is typically between 30° and 60°, depending on the tool type. Hold the handle firmly and move the blade smoothly across the abrasive in one direction. Keep the motion even and avoid excessive pressure. You should see bright, uniform metal appear along the bevel.
Once the initial bevel is consistent, move to a finer grit to remove scratches left by the previous step. Work through a logical progression such as 220, 400, 800, 1200, and finally 2000 grit. Continue until you can feel a light burr along the edge, which indicates the bevels have met evenly. Then repeat the same sequence on the second blade. Check your progress under strong light; a polished, uniform surface without visible grooves means the edge is nearly ready for finishing.
Pro Tip:Avoid overheating the metal. If the blade becomes warm, pause and let it cool. Excessive heat can draw the temper and soften the edge, reducing its effectiveness. You can prevent this by applying light, consistent pressure and keeping the abrasive surface clean.
Step 3: Buff and Polish the Edges
Once both bevels are sharp, switch to a strop or buffing pad charged with polishing compound. This step removes microscopic burrs and refines the cutting surface to a mirror finish. Draw each blade across the strop at the same bevel angle used during sharpening, moving away from the edge with each stroke. Alternate sides to keep the burr from folding over. After several passes, you should feel the edge smooth out and see a bright reflection along the cutting line.
Use a clean cloth to wipe away remaining compound and inspect both blades. Then take the following steps:
- Lightly oil the pivot area and reassemble the scissors or shears.
- Tighten the screw until the blades meet with steady resistance but still move freely.
- Test the edge on appropriate material (fabric, paper, or wire), depending on the tool’s purpose. A properly sharpened pair should cut cleanly with minimal effort and no snagging.
Maintenance and How Often to Sharpen
When you take care of the blades after each use, you prevent dulling and corrosion, keeping the tool’s cutting action consistent over time. Regular cleaning, light lubrication, and inspection help you spot wear early, so you can correct it before it affects performance.
Recognizing When It’s Time to Sharpen
Blades lose their edge gradually, so you may not notice the decline right away. A sharp pair cuts cleanly with minimal pressure, while dull edges tend to pull, snag, or crush material instead of slicing through it. If you have to apply extra force or the blades begin leaving frayed edges, it’s time to sharpen. You can also check for dullness by examining the bevel under bright light; shiny flat spots along the edge indicate rounding or wear.
Routine Care Between Sharpenings
After each use, wipe the blades with a clean, dry cloth to remove dust, fibers, or residue. For tools used in humid or outdoor conditions, apply a small amount of oil to prevent oxidation. Check the pivot screw periodically and adjust tension if needed: the blades should close with smooth resistance and no gap between them. Store scissors and shears in a dry place, preferably with blade covers or in a case, to prevent contact with hard surfaces that can nick the edge.
Sharpening Frequency Guidelines
The right sharpening interval depends on the type of work and material you cut. Scissors used in textile or paper applications may need attention every few months. Industrial or horticultural shears that cut dense or abrasive materials might need sharpening every few weeks.
Light maintenance, such as stropping or buffing, between full sharpenings helps preserve the bevel and reduces metal removal over time. By following a consistent schedule, you maintain cutting efficiency and avoid excessive wear.
Common Problems and Troubleshooting
Most problems trace back to inconsistent angles, excessive heat, or improper reassembly. Use the points below to diagnose common symptoms and restore cutting accuracy.
- Uneven Cutting or Edge Chatter:If one blade cuts while the other drags, the bevels may not be meeting evenly along the contact line. This usually happens when the sharpening angle varies between passes or when the blade wasn’t held flat against the abrasive surface. Reinspect the bevels under bright light and look for areas that reflect differently. Regrind those sections using controlled pressure and consistent movement until both edges meet.
- Overheating or Softened Edges:Heat buildup can reduce blade hardness and shorten edge life. If you notice discoloration or a bluish tint near the edge, the steel has likely overheated. To prevent this, use light pressure, keep the abrasive surface clean, and allow the blade to cool between passes. For power equipment, short bursts of contact followed by cooling periods help preserve temper and maintain a stable cutting edge.
- Deep Nicks or Edge Chips:When blades hit hard material like wire or staples, the edge may chip or form small divots. Start with a coarse abrasive to grind past the damage, then re-establish the original bevel. Follow up with finer grits to smooth the surface and remove any remaining marks. If the damage extends far into the blade, regrind the entire bevel evenly.
- Uneven Bevels or Asymmetry:Inconsistent angles on each side of the blade can cause poor alignment and uneven cutting. This issue often comes from hand fatigue or working without proper blade support. You can correct it by marking the bevel with a permanent marker and regrinding until the ink wears away evenly. Maintaining stable pressure and checking progress frequently ensures the bevel width remains uniform from heel to tip.
- Blade Misalignment After Reassembly:If the blades cross or fail to close properly after sharpening, the pivot tension or washer placement may be off. Loosen the screw slightly and test movement until both blades meet at the midpoint of the stroke. They should contact along their entire length without binding. Proper alignment ensures the blades shear rather than wedge, producing a cleaner, more controlled cut.
Best Abrasives to Use for Sharpening Scissors and Shears
Choosing the right abrasive depends on your blade material, bevel angle, and the type of work the tool performs. Each abrasive grain has different cutting behavior, heat resistance, and durability. When you match the abrasive to the steel, you remove just enough material to restore the edge without impacting tool performance.
Aluminum Oxide
Aluminum oxide is the most versatile abrasive for sharpening common tool steels. It cuts evenly, resists clogging, and leaves a consistent finish. This abrasive works well for stainless and high-carbon steels used in everyday scissors and light-duty shears. It’s ideal for early sharpening stages using 80–220 grit, then for intermediate finishing up to 600 grit. Aluminum oxide maintains a moderate cutting rate without generating excessive heat, making it suitable for manual and powered sharpening systems.
Zirconia Alumina
Zirconia alumina excels when you need more aggressive material removal. It stays sharp as it wears, allowing longer use under pressure. This abrasive works best for heavy-duty shears, garden tools, and industrial blades that cut dense or fibrous materials. Use it in coarse to medium grits (40–220) to remove damage or reshape bevels. Because zirconia grains fracture during use, they expose fresh cutting edges that keep the sharpening rate steady across multiple passes.
Ceramic
Ceramic abrasives provide the most durable and consistent cutting action for hardened steels and high-end grooming shears. They excel at maintaining uniform pressure and resist heat better than most materials. Ceramic belts or discs in 120–2000 grit deliver excellent edge retention with minimal material loss. The fine grain structure makes them perfect for finishing and polishing convex or mirror edges on precision shears. While ceramic abrasives cost more upfront, their lifespan and performance justify the investment for professional sharpening operations.
Silicon Carbide
Silicon carbide has a sharper, more brittle grain structure than aluminum oxide, which allows it to cut hard or coated metals effectively. It’s commonly used for polishing or refining the final edge, especially on stainless and high-chrome steels. Silicon carbide sheets in 800–2000 grit work well for hand-finishing or preparing blades for stropping. Because it removes material quickly, use light pressure and monitor the edge closely to prevent rounding or over-polishing.
Finishing Strong: How to Keep Your Blades Performing
Sharpening scissors and shears keeps your tools efficient and extends their service life. When you maintain the correct bevel, use the proper abrasive sequence, and finish the edges carefully, you restore the tool’s cutting accuracy without removing excess material.
With the right abrasives, you can achieve results that match or exceed factory finishes. Red Label Abrasives provides sanding belts, sanding discs, and sanding sheets in grits suitable for every stage, from heavy stock removal to fine polishing. Whether you work in a professional shop or maintain tools for daily production, keeping a full range of quality abrasives on hand helps maintain consistent performance. If you have questions or would like to place an order, please fill out a contact form or call 844-824-1956 today.


Our Most Popular Abrasives

EdgeCore Ceramic Sanding Belts

EdgeCore Ceramic Flap Discs

Buffing Kit
Shop By Product Category


Why Choose Red Label?

