Your Cart is Empty


The Parts Of A Sword: Sword Anatomy Explained

Quick Overview
Swords have embodied power, artistry, and history for millennia. Understanding a sword's anatomy—its blade, hilt, crossguard, tang, and scabbard—is important for appreciating its craftsmanship, ensuring proper handling, and connecting with its historical legacy. The blade defines its purpose and effectiveness. The hilt offers control and balance while the crossguard protects the hand during combat. The tang ensures the sword's integrity and the scabbard guards the blade, facilitating safe transport. Maintaining a sword's sharpness involves selecting appropriate abrasives and applying them carefully.
Swords have always been more than just weapons; they're symbols of power, artistry, and history wrapped into one. From the ancient samurai of Japan to the knights of medieval Europe, swords have played a key role in battles and have been a centerpiece in stories and legends. Today, they capture the fascination of enthusiasts, collectors, and martial artists alike.
Understanding the anatomy of a sword is essential for anyone passionate about these historic weapons. For collectors, it's all about appreciating the art and skill that goes into each piece. For martial artists, it's more about knowing the tool of their practice and ensuring they handle and use it correctly and safely. And for enthusiasts, it's about connecting more deeply with history and the stories of those who wielded these swords long ago.
In this blog, the team at Red Label Abrasives will break down the main parts of a sword: the blade, the hilt, including its grip, guard, and pommel; the crossguard, the tang, and even the scabbard that houses the sword. By exploring these components, we'll uncover not just how a sword is made, but why each part matters and how they come together to create something that's been revered through the ages. We’ll also show you how to keep your sword in excellent working condition for years to come.
The Blade
The blade is what turns a piece of metal into a weapon, a tool, or a piece of art. Its design, shape, and features determine not just how the sword is used, but also how well it fulfills its intended purpose.
When it comes to types of blades, there's a wide variety to consider, each with its own advantages. Straight blades are often seen in swords designed for thrusting and precise cuts, like the classic European longsword. Curved blades, on the other hand, are designed to excel in slashing, which is why they’re found in swords like the katana or the saber. The choice between a straight and a curved blade depends on the fighting style and the needs of the user.
Blade Components
Edge
The edge is essentially the business part of the sword because it does the cutting. A well-crafted edge can make the difference between a sword that's a true weapon and one that's merely decorative.
Fuller
Moving up the blade from the edge, we find the fuller, a groove that runs along part of its length. It helps reduce the weight of the blade without sacrificing its strength, making the sword easier to handle and maneuver.
Ricasso
Next is the ricasso, an unsharpened section of the blade just above the guard. This area allows the user to place a finger above the guard to achieve better control and precision in certain fighting techniques. Not all swords have a ricasso, but when they do, it's a sign of a sword designed for skilled hands.
Tip
Finally, we reach the tip of the blade, the point designed for piercing. The shape of the tip can vary widely, from narrow and sharp for thrusting swords to broad and rounded for those more suited to slashing. The design of the tip plays a critical role in how the sword penetrates or cuts.
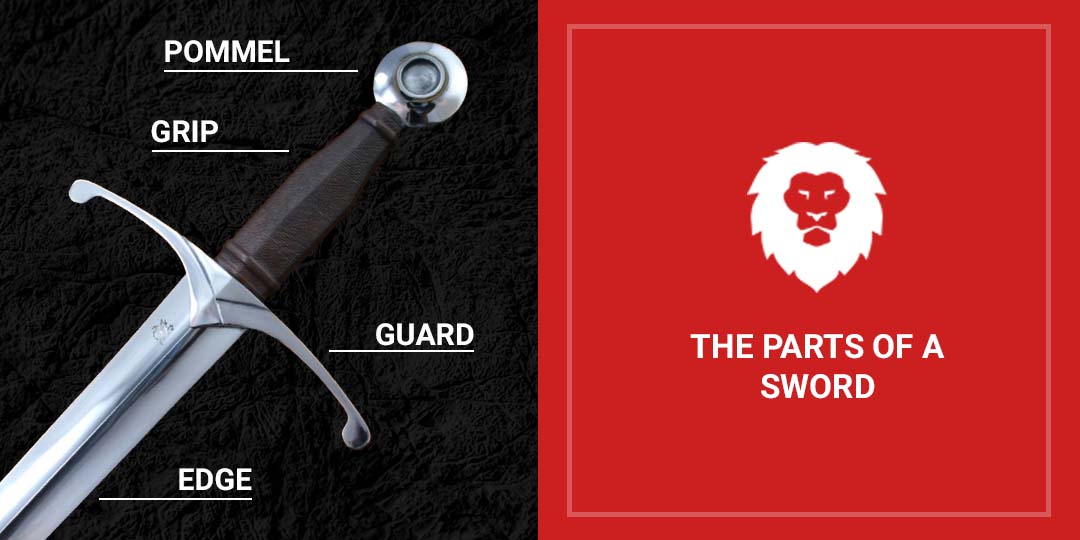
The Hilt
The hilt of a sword is essentially its handle. It ensures that the sword feels like an extension of the wielder's arm and allows for precise and deliberate movements.
Hilt Components
Grip
Breaking down the hilt, we first have the grip. This is where the sword's design meets the user's hand. Materials like leather, wood, and metal are commonly used, each offering a different feel and level of control. The grip needs to be comfortable enough for extended use while providing enough friction to keep the sword securely in hand during a swing or thrust. Ergonomics play a big role here; a well-designed grip can make the difference between a sword that feels balanced and one that's awkward to use.
Guard
Next up is the guard, which serves as a barrier protecting your hand from an opponent's blade. There are various types of guards, such as the simple crossguard, which extends across the hilt, to more complex designs like the basket-hilt, which encloses the hand for greater protection. The guard's design can significantly affect the sword's overall balance and how it's used in combat.
Design variations in crossguards are vast. In some swords, like the classic European longsword, the crossguard is simple and straight, extending out from the sides of the hilt to form a basic "T" shape. This design is straightforward and functional, providing a good level of protection without being too elaborate.
Swords from different cultures or periods sometimes feature more elaborate crossguards. The rapier, for example, often has an ornate guard that includes not just the crossguard but also rings, bars, or a cup hilt to offer even more protection for the hand.
Tang
The tang is the extension of the blade that goes inside the hilt. You can think of it as the backbone of the sword, holding everything together. Without a strong tang, a sword is more likely to break or come apart during use.
There are mainly two varieties: full tang and partial tang. A full tang means that it extends the full length and width of the hilt. This design is a marker of a sturdy and well-balanced sword because it ensures that the blade and hilt are securely connected. Swords with full tangs are often heavier, but they offer greater balance and durability.
With partial tangs, the tang does not extend the full length or width of the hilt. There are several types of partial tangs, such as the stick tang or rat-tail tang, which might be narrower or shorter than the grip. While swords with partial tangs can be lighter and easier to handle, they might not offer the same level of strength and stability as their full tang counterparts. This doesn't mean they're inferior; it's just a trade-off between weight, balance, and durability that depends on the sword's intended use and design preferences.
Pommel
The last part is the pommel. Located at the very end of the hilt, the pommel acts as a counterweight to the blade. This balancing act helps in managing the sword's weight distribution, making it easier to wield. The pommel also offers a canvas for craftsmanship and artistry, so it’s often adorned with intricate designs or inscriptions. It's a finishing touch that can make a sword truly stand out.
The Scabbard
The scabbard of a sword serves two main purposes: protecting the blade and making it easier to carry. Without a scabbard, a sword's edge could become dull or damaged, and carrying it around would be not only cumbersome but potentially dangerous.
Scabbards are made from a variety of materials, each chosen for its durability and the level of protection it offers the sword. Leather and wood are among the most common choices. Leather is flexible and can be easily shaped to fit the blade snugly while wood provides a sturdy frame that guards against impacts. Some scabbards also feature metal fittings or reinforcements at the tip and throat (the opening where the blade enters), adding an extra layer of protection and durability.
When it comes to design and decoration, scabbards reflect the culture and period from which they come. Ornamentation can range from simple tooling or dyeing of the leather to elaborate inlays of precious metals and jewels on the scabbard's surface. Ceremonial swords, for example, might have more elaborate scabbards designed to impress and convey prestige, while practical, battle-ready swords would have sturdier, less ornate scabbards focused on functionality.
Keeping Your Sword Sharp
Keeping your sword sharp is a key part of its maintenance. Using abrasives is one of the most effective methods to sharpen the blade, but it requires a bit of know-how to do it properly. Here's a straightforward guide to get you started.
Step 1: Choose the Right Abrasive
Abrasives come in various forms, including whetstones, sandpaper, and sanding discs and belts, each with different grit sizes. Start with a coarser grit to remove any nicks or imperfections, and gradually move to finer grits for a sharp, polished edge. For most swords, beginning with a grit size around 400-600 for initial sharpening and moving up to 1000-2000 for finishing is a good rule of thumb.
Step 2: Prepare Your Workspace
Find a stable, well-lit workspace where you can comfortably handle the sword and abrasive. Lay down a non-slip mat to keep things in place. Ensure the area is free from distractions and safe for handling sharp objects.
Step 3: Secure the Sword
If possible, secure the sword in a vise or clamping device with soft jaws to prevent damage to the blade. If you don't have these tools, make sure the sword is safely positioned so it won't move while you're sharpening it.
Sharpening the Blade
Hold the abrasive at the correct angle to the blade—typically around 20 degrees for most swords, but this can vary. Use even, controlled strokes along the length of the blade, moving from the base near the hilt to the tip. Consistency is key; maintain the same angle and pressure with each stroke. Start with the coarser grit to work out any imperfections, then switch to finer grits to refine and polish the edge.
Step 5: Check Your Progress
Periodically check the sharpness of your blade by carefully running your thumb *perpendicular* to the edge (never along the edge). You're looking for a consistent feel across the blade. Another method is to gently test the blade on a piece of paper; a sharp sword should cut smoothly and cleanly.
Step 6: Clean and Protect
Once you're satisfied with the sharpness, clean the blade with a soft, dry cloth to remove any metal filings or abrasive residue. Apply a light coat of oil to protect the blade from rust and corrosion, especially if you won't be using it for a while.
By following these steps and practicing patience and care, you'll keep your sword sharp, effective, and looking its best.
Shape & Sharpen Your Swords With Red Label Abrasives
Swords are far more than tools of combat; they are expressions of culture, symbols of power, and artifacts of history, each with a story to tell. For those who collect, practice martial arts, or simply hold a fascination for these magnificent weapons, understanding their components deepens our appreciation and respect for them.
When it comes to creating swords and keeping them in prime condition, the right abrasives play an important role. Whether you're restoring an antique blade, maintaining a practice sword, or sharpening a piece of your collection, Red Label Abrasives has the quality materials you need.
With a wide selection of abrasives suited for any stage of the sharpening process, from coarse grits for shaping and removing imperfections to fine grits for polishing and honing, Red Label is your go-to source. We offer premium-quality sanding belts, sanding discs, sanding sheets, and other abrasive products designed for excellent results on blade metal. Our expert team is always ready to provide support. If you have questions or would like to place an order, please contact us by calling 844-824-1956 or filling out our contact form today.


Belt Packs Made For Knife Makers

2 X 72 Inch Knife Makers Sanding Belts Assortment

2 X 60 Inch Knife Makers Sanding Belts Assortment

2 X 48 Inch Knife Makers Sanding Belts Assortment

2 X 36 Inch Knife Makers Sanding Belt Assortment

2 X 42 Inch Knife Makers Sanding Belts Assortment

1 X 30 Inch Knife Makers Sanding Belts Assortment

1 x 42 Inch Knife Makers Sanding Belt Assortment
Shop By Product Category


Why Choose Red Label?

